> ## Documentation Index
> Fetch the complete documentation index at: https://docs.begin.eu/llms.txt
> Use this file to discover all available pages before exploring further.
# Begin MCP
> Use Begin from Claude and ChatGPT through the Model Context Protocol.
 Begin exposes a Model Context Protocol (MCP) server, so you can drive your workspace from the chat tools you already use: Claude on the web or desktop, and ChatGPT. The connection signs in with your Begin account, uses the same permissions as the web app, and is scoped to a single workspace.
## What you can do
Once connected, your AI client can list and manage everything you manage in the web app: positions, people, locations, departments, the schedule, and timesheets. Read tools answer immediately. Write tools (create, update, delete, approve) run under your permissions, since authorizing the connection is the consent step.
If your role doesn't grant a permission in the web app, the same restriction applies through MCP.
You'll see a clear "Permission denied" response on any tool call outside your scope.
## Example prompts
What did the schedule look like last week?
Who's working at our Boston location on Friday?
Approve all pending timesheets for Anna for this month.
Add a new bartender position with the same color as the existing kitchen position.
Schedule the Cashier team for 9am–5pm next Tuesday.
## Connect Claude
The path is the same on Claude on the web (claude.ai) and Claude Desktop.
In Claude, go to **Settings → Connectors → Add custom connector**.
Use `https://api.begin.eu/mcp`.
Claude opens a browser tab. Use your normal sign-in method: phone OTP, email OTP, passkey, or
Google.
Confirm the connection to finish.
Custom connectors are available on Claude Free, Pro, Max, Team, and Enterprise. Free is capped at one custom connector. On Team and Enterprise, only Owners can add connectors.
## Connect Claude Code
If you use Claude Code in your terminal, register Begin as a remote MCP server with one command.
```bash theme={null}
claude mcp add --transport http begin https://api.begin.eu/mcp
```
Then run `/mcp` inside Claude Code to authenticate. Claude Code opens a browser window to sign in to Begin and approve the connection. Subsequent sessions reuse the cached token.
## Connect ChatGPT
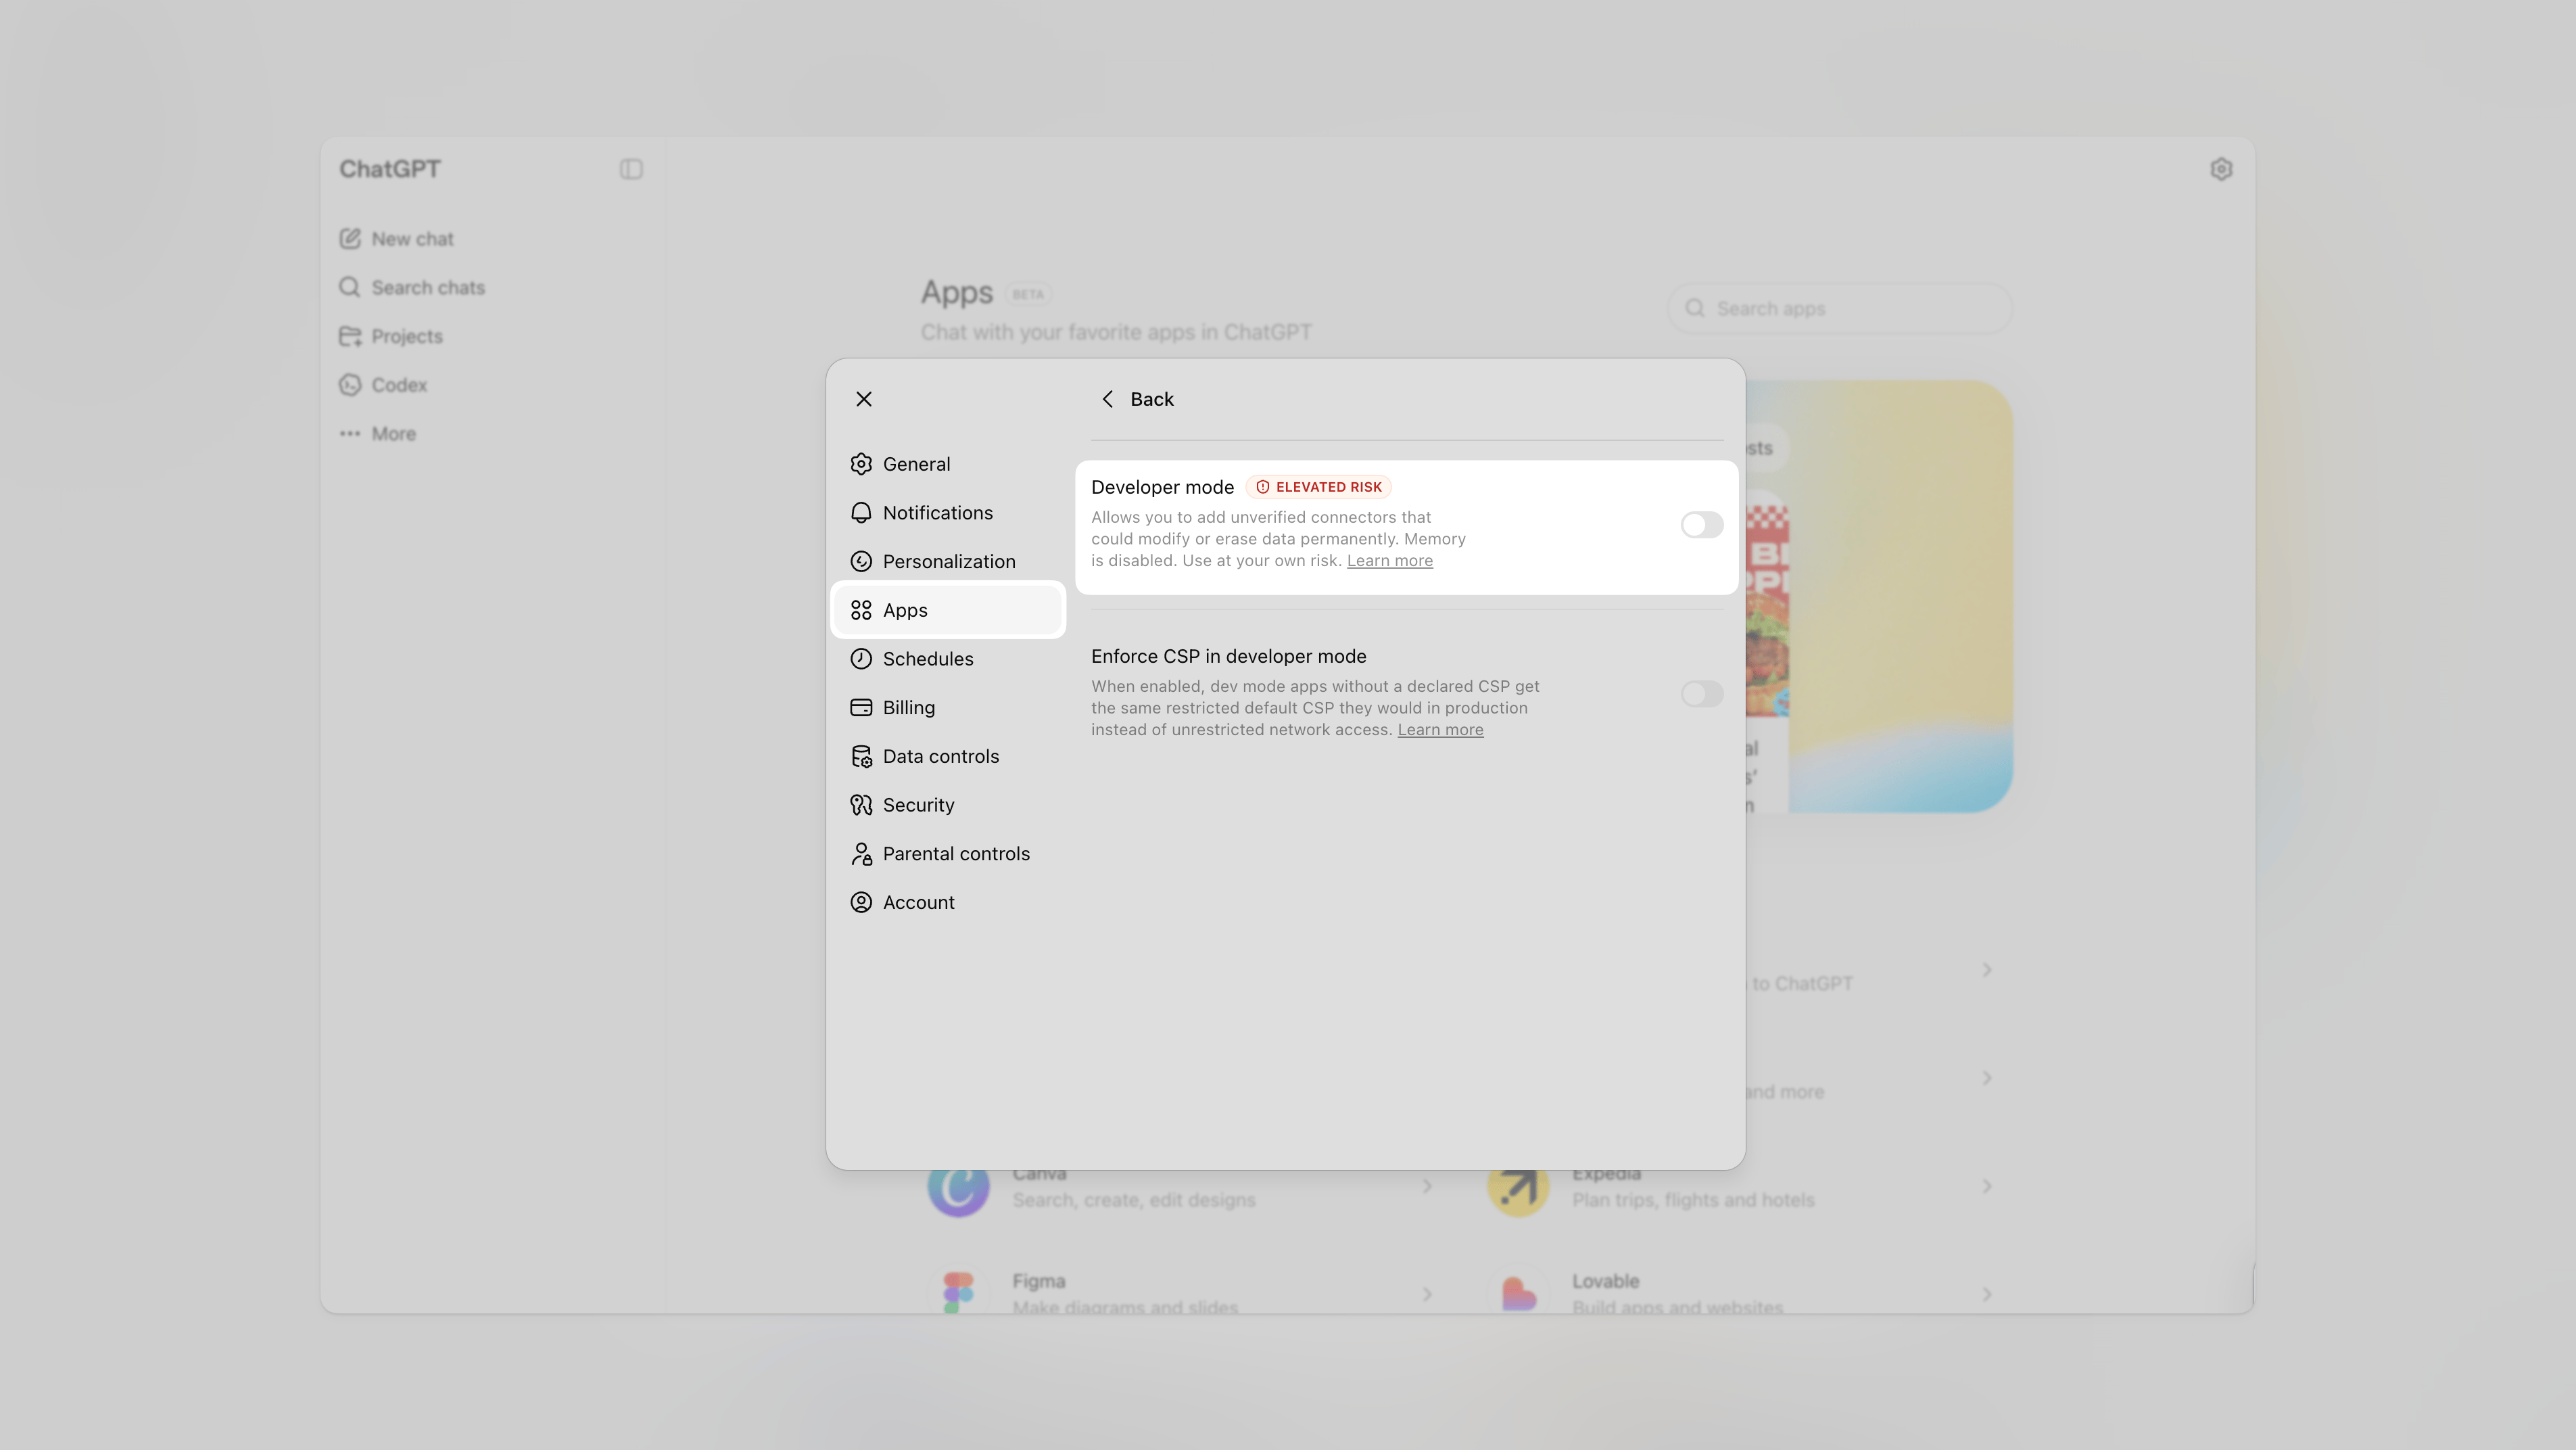
ChatGPT requires turning on Developer mode before you can create an app.
In ChatGPT, click your profile picture and go to **Settings → Apps → Advanced settings**.
Toggle **Developer mode** on.
Begin exposes a Model Context Protocol (MCP) server, so you can drive your workspace from the chat tools you already use: Claude on the web or desktop, and ChatGPT. The connection signs in with your Begin account, uses the same permissions as the web app, and is scoped to a single workspace.
## What you can do
Once connected, your AI client can list and manage everything you manage in the web app: positions, people, locations, departments, the schedule, and timesheets. Read tools answer immediately. Write tools (create, update, delete, approve) run under your permissions, since authorizing the connection is the consent step.
If your role doesn't grant a permission in the web app, the same restriction applies through MCP.
You'll see a clear "Permission denied" response on any tool call outside your scope.
## Example prompts
What did the schedule look like last week?
Who's working at our Boston location on Friday?
Approve all pending timesheets for Anna for this month.
Add a new bartender position with the same color as the existing kitchen position.
Schedule the Cashier team for 9am–5pm next Tuesday.
## Connect Claude
The path is the same on Claude on the web (claude.ai) and Claude Desktop.
In Claude, go to **Settings → Connectors → Add custom connector**.
Use `https://api.begin.eu/mcp`.
Claude opens a browser tab. Use your normal sign-in method: phone OTP, email OTP, passkey, or
Google.
Confirm the connection to finish.
Custom connectors are available on Claude Free, Pro, Max, Team, and Enterprise. Free is capped at one custom connector. On Team and Enterprise, only Owners can add connectors.
## Connect Claude Code
If you use Claude Code in your terminal, register Begin as a remote MCP server with one command.
```bash theme={null}
claude mcp add --transport http begin https://api.begin.eu/mcp
```
Then run `/mcp` inside Claude Code to authenticate. Claude Code opens a browser window to sign in to Begin and approve the connection. Subsequent sessions reuse the cached token.
## Connect ChatGPT
ChatGPT requires turning on Developer mode before you can create an app.
In ChatGPT, click your profile picture and go to **Settings → Apps → Advanced settings**.
Toggle **Developer mode** on.
 The button appears next to **Advanced settings** once Developer mode is on.
Use `https://api.begin.eu/mcp` as the MCP server URL, plus a name and short description.
The button appears next to **Advanced settings** once Developer mode is on.
Use `https://api.begin.eu/mcp` as the MCP server URL, plus a name and short description.
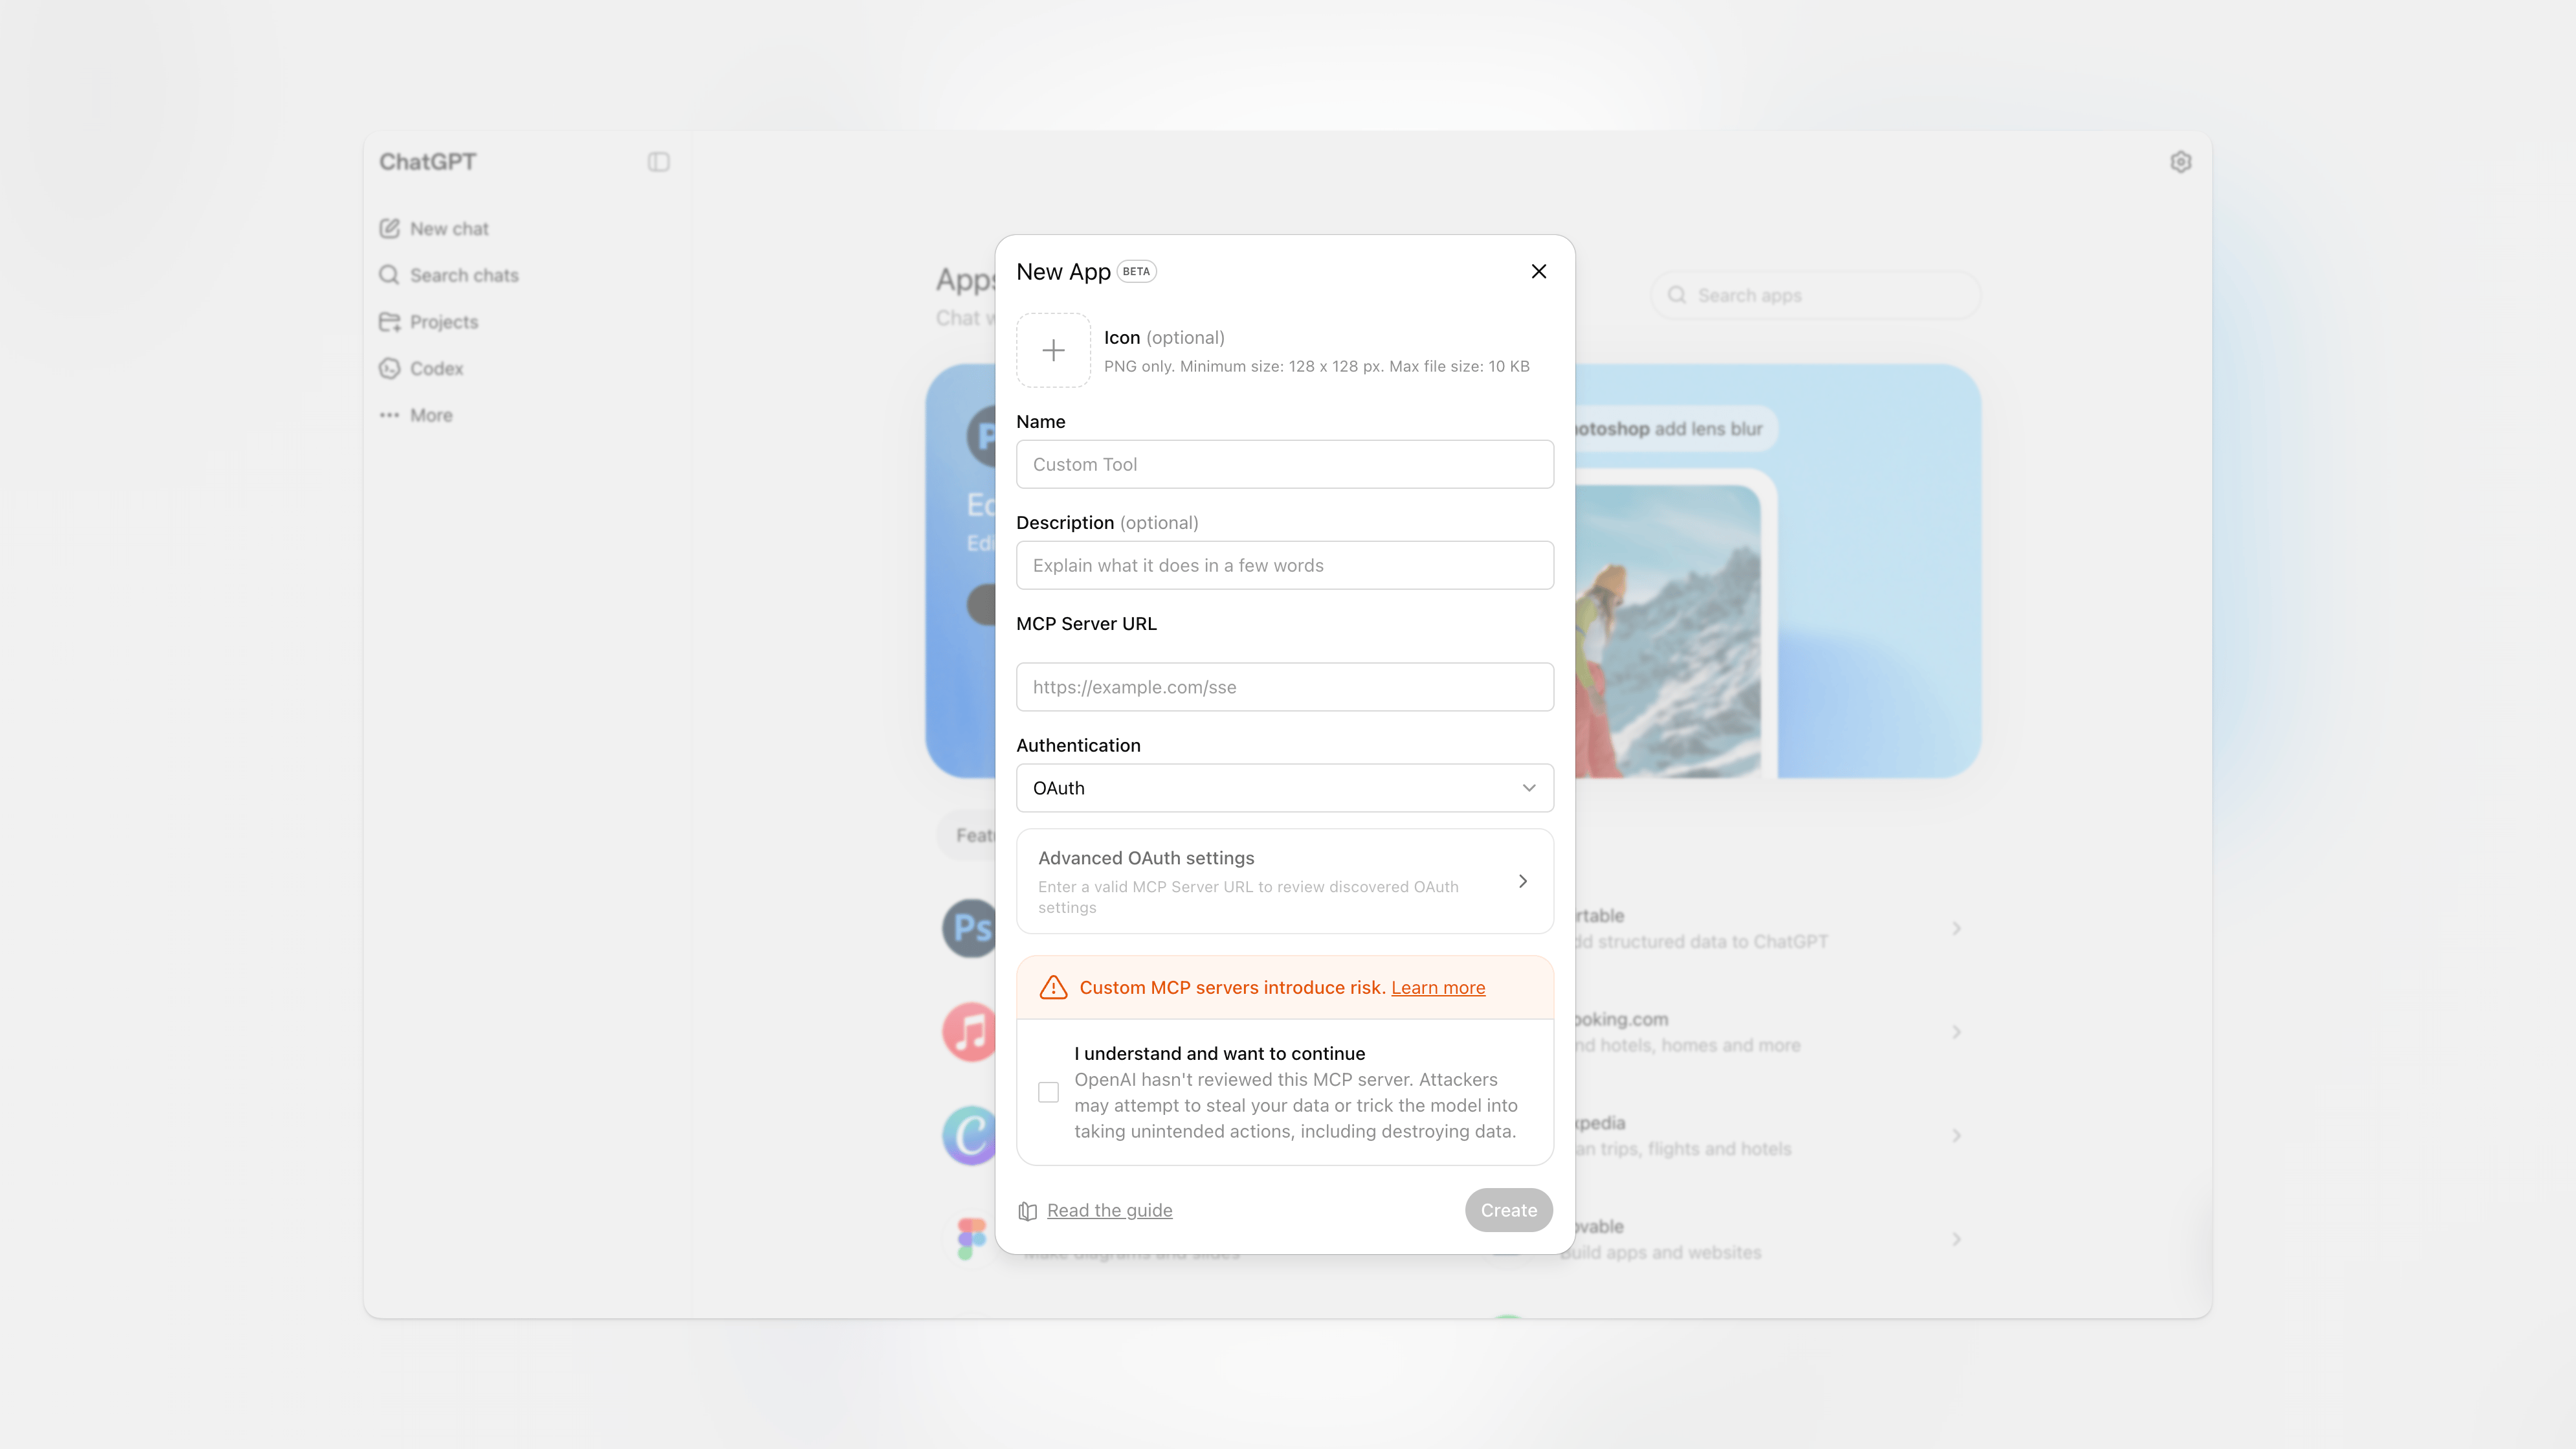 In the popup, sign in and approve the consent screen.
Custom apps are available on ChatGPT Pro, Plus, Business, Enterprise, and Education. They aren't
available on Free. On Business, Enterprise, and Education, an admin must enable Developer mode
under **Workspace Settings → Permissions & Roles → Connected Data**.
## Workspace pinning
Your MCP connection is **pinned to whichever workspace is active the first time your client uses the connection** — not at the moment you authorize it. Once pinned, switching workspace in the web app does not change the workspace your MCP client uses. This is intentional, so an automation can't silently retarget.
To operate on a different workspace from an MCP client:
In the Begin web app, set the target workspace as active.
In **Settings → Security → Connected MCP clients**, revoke the current pin.
Your next request pins to the new workspace.
The `whoami` tool returns the workspace your client is currently pinned to, which is useful to confirm before destructive operations.
## Manage connected clients
**Settings → Security → Connected MCP clients** shows every MCP client you've authorized, the workspace each is pinned to, and when each was last active. Revoke a single client or revoke all of them. Once revoked, the next request from that client returns 401 and the user has to reconnect.
## Permissions and security
* Each MCP token grants the same permissions as the user who authorized it. Never more.
* Connections are scoped to one workspace at a time.
* Tokens are short-lived (1 hour) with refresh-token rotation; clients refresh them silently.
* All actions are written to the workspace audit log under your name.
In the popup, sign in and approve the consent screen.
Custom apps are available on ChatGPT Pro, Plus, Business, Enterprise, and Education. They aren't
available on Free. On Business, Enterprise, and Education, an admin must enable Developer mode
under **Workspace Settings → Permissions & Roles → Connected Data**.
## Workspace pinning
Your MCP connection is **pinned to whichever workspace is active the first time your client uses the connection** — not at the moment you authorize it. Once pinned, switching workspace in the web app does not change the workspace your MCP client uses. This is intentional, so an automation can't silently retarget.
To operate on a different workspace from an MCP client:
In the Begin web app, set the target workspace as active.
In **Settings → Security → Connected MCP clients**, revoke the current pin.
Your next request pins to the new workspace.
The `whoami` tool returns the workspace your client is currently pinned to, which is useful to confirm before destructive operations.
## Manage connected clients
**Settings → Security → Connected MCP clients** shows every MCP client you've authorized, the workspace each is pinned to, and when each was last active. Revoke a single client or revoke all of them. Once revoked, the next request from that client returns 401 and the user has to reconnect.
## Permissions and security
* Each MCP token grants the same permissions as the user who authorized it. Never more.
* Connections are scoped to one workspace at a time.
* Tokens are short-lived (1 hour) with refresh-token rotation; clients refresh them silently.
* All actions are written to the workspace audit log under your name.